

Docker Compose basics on a NAS: stacks, volumes and networks explained
Docker Compose is the skill that makes every other self-hosting guide on this site easier. Instead of memorising long terminal commands, you describe each app — its image, ports, folders and settings — in one small text file, and a single command builds, starts, updates or rebuilds the whole thing exactly as described.
Published Nov 17, 2026 · Last updated Nov 18, 2026
People often learn Docker backwards: a tangle of docker run commands copied from forum posts, each with flags nobody can reconstruct a month later. When a container breaks or needs updating, there is no record of how it was created. Compose fixes that by making the file the source of truth. If you can read the file, you understand the setup — and so can anyone helping you. This guide explains each part of a compose file in plain language, builds a small working stack, and finishes with the update routine that keeps containers current without gambling your data.
What Docker Compose actually is
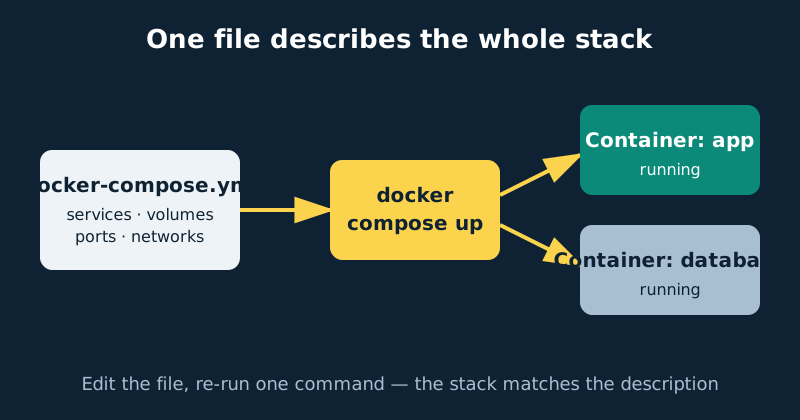
A container is a single running app, created from an image — a packaged snapshot of that app and everything it needs. A service in a compose file is the recipe for one container: which image, which ports, which folders, which settings. A stack (Compose calls it a project) is all the services defined in one file, started and stopped together. Many real apps are small stacks rather than single containers: a photo app might need a database beside it, and the two services belong in one file because they live and die together.
When you run docker compose up -d in a folder, Compose reads the file, compares it with what is already running, and changes only what differs. Edit a port, re-run the command, and just that container is recreated. Delete the containers entirely and the same command rebuilds them identically — as long as your data lives outside the containers, which is what volumes are for.
What you need
- A NAS or small server with Docker and the Compose plugin installed. Check with
docker compose version— note there is no hyphen; the old standalonedocker-composecommand is retired. - Terminal access to your NAS (SSH is fine) and a text editor you are comfortable with.
- A folder convention decided in advance — one folder per stack, all under a single parent such as
/volume1/dockeror~/docker. Consistency here pays off every time you back up or troubleshoot. - About an hour to work through the example stack and the anatomy section below.
Step-by-step: your first stack
- Create the folder. Make a folder named
uptime-kumainside your Docker parent folder. The folder name becomes the project name, and every file for this stack lives here. - Create the compose file. Inside it, create
docker-compose.ymlwith the content shown in the example below. This stack runs Uptime Kuma, a monitoring tool, plus a tiny test service that demonstrates networking. - Create the
.envfile beside it holding your time zone (also shown below). Compose substitutes variables like${TZ}automatically from this file. - Start the stack with
docker compose up -d. The-druns it detached, in the background. First start downloads the images, so give it a minute. - Check it worked.
docker compose pslists the stack’s containers and their status;docker compose logs -fstreams their logs. Openhttp://your-nas-address:3001and you should see the Uptime Kuma setup screen. - Make a change. Edit something small — change the container name, or the left-hand port — then run
docker compose up -dagain. Notice only the affected container is recreated. This edit-file, re-run-command loop is the whole workflow. - Stop things cleanly.
docker compose downremoves the containers and the stack’s network, but leaves your data folders and named volumes untouched. Your stack is now just files on disk, ready to be started again or copied to another machine.
Anatomy of a compose file
Here is the example stack in full. Every key in it is one you will use constantly:
services:
  uptime-kuma:
    image: louislam/uptime-kuma:1
    container_name: uptime-kuma
    restart: unless-stopped
    ports:
      - "3001:3001"
    volumes:
      - ./kuma-data:/app/data
    environment:
      - TZ=${TZ}

  whoami:
    image: traefik/whoami:latest
    container_name: whoami
    restart: unless-stopped
    networks:
      - internal

networks:
  internal:
    driver: bridge
    internal: true
image names the app and its version tag. The :1 tag on Uptime Kuma is a deliberate choice worth understanding: it is a major-line tag, which the publisher re-points at every new 1.x release, so docker compose pull moves you forward within the v1 line. Convenient — but it is not a reproducible version pin, because the same compose file can install a different release next month. :latest floats further still, to whatever is newest, which is convenient and occasionally surprising. For a service whose data or behaviour matters, pin an exact release instead — image: louislam/uptime-kuma:1.24.6 always installs exactly that version, and you change the number deliberately, after reading the release notes (the FAQ below expands on tags versus pins). container_name is optional but makes logs and commands easier to read. restart: unless-stopped is the right default for home services: the container comes back after a reboot or crash, but stays down if you deliberately stopped it.
Ports are written "host:container" — left side is the port on your NAS, right side is the port the app expects inside its container. They only need to match if the app demands it; if 3001 were already taken on your NAS, "3002:3001" would work fine. Only published ports are reachable from your network at all, which is why the whoami service above — with no ports published — is invisible outside Docker.
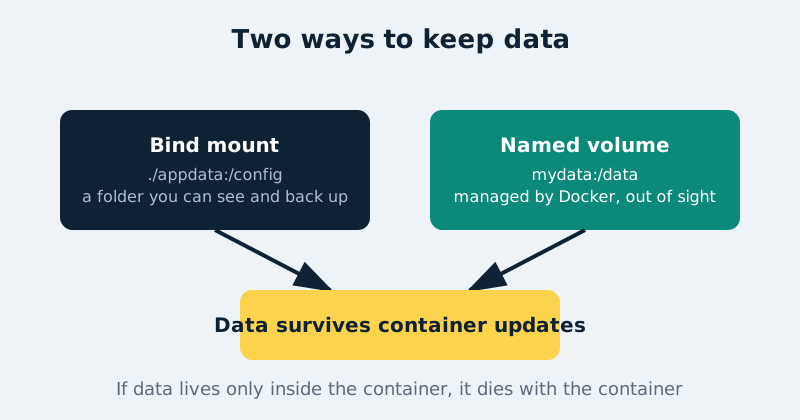
Volumes are where data survives. The line ./kuma-data:/app/data is a bind mount: a real folder beside your compose file, mapped into the container. You can open it, inspect it and back it up with ordinary tools, which is why bind mounts suit app configuration and data you care about. The alternative is a named volume, declared like this:
services:
  app:
    volumes:
      - app-db:/var/lib/postgresql/data

volumes:
  app-db:
Named volumes are managed by Docker in its own storage area. They are fast, avoid file-permission surprises, and suit databases — but they are out of sight, so you must remember they exist when backing up. A common pattern: named volumes for databases, bind mounts for everything you might want to read, edit or copy by hand. Either way, the rule is absolute: data stored only inside a container disappears when the container is removed.
Environment variables pass settings into the container. Keep shared values and secrets in the .env file rather than scattering them through the compose file:
# .env — keep private if it holds passwords
TZ=Etc/UTC
Networks are the quiet superpower. Compose puts all services in one file on their own private network, where they reach each other by service name — an app connects to its database at the hostname db, no IP addresses needed. Containers on other stacks cannot see them. The internal network in the example goes further — but only because of its internal: true line. That setting is what actually restricts external connectivity for containers attached only to that network. The name alone does nothing: a plain bridge network that happens to be called internal is an ordinary network with full outbound access. Two qualifications matter. First, the restriction applies per container, not per network name — if a service joins an ordinary network as well as the internal one, it can still reach out through the ordinary network. Second, keep inbound and outbound separate in your mind: a container with no published ports cannot be reached from your network, but on an ordinary network it can still connect out to the internet. Having no published ports is not the same as having no external connectivity; internal: true is what closes the outbound route.
Updating a container safely
Updating is a three-command routine. Inside the stack’s folder: docker compose pull downloads newer images, docker compose up -d recreates only the containers whose images changed, and docker image prune tidies away the old images afterwards. Before any update, glance at the project’s release notes and make sure your backup of the stack’s data folders is current — a recreation is painless, but only a backup lets you go backwards if the new version misbehaves. If an update does go wrong, change the image tag back to the previous version and re-run docker compose up -d.
Common mistakes and troubleshooting
YAML indentation errors
Compose files are YAML, and YAML is fussy: indent with spaces, never tabs, and keep each level aligned. A file that fails with a mapping error is almost always mis-indented. Run docker compose config to validate the file and see exactly how Compose interpreted it before starting anything.
Port already in use
Two services cannot publish the same host port. Change the left-hand number of the mapping and re-run; nothing inside the container needs to know. Keep a simple list of which ports your stacks use — collisions get harder to spot as the NAS fills up.
Permission denied on a bind-mounted folder
The container’s user cannot write to your folder. Check the folder’s ownership, and where an app supports PUID/PGID environment variables, set them to your own user and group IDs so files stay yours.
Editing the file changes nothing
You probably edited a copy in a different folder, or the running stack was created from a different file. Compose works on the file in the current directory — docker compose config shows the file in use, and its output settles any argument.
Will your imports hardlink — or silently copy? Run your volume layout through the hardlink checker: it resolves your mounts the way Sonarr and Radarr see them and hands back the corrected single-/data layout if yours would copy.
Official documentation and references
- Docker documentation — Docker Compose overview and getting started
- Docker documentation — the Compose file reference
- Docker documentation — environment variables in Compose
Frequently asked questions
Do I still need the terminal if my NAS has a Docker app?
NAS Docker interfaces are usually graphical wrappers around these same concepts, and most can import or edit compose files directly. Learning the file format is still worth it: the file is portable between NAS brands, searchable when you need help, and the only complete record of how a stack was built.
One big compose file for everything, or one per stack?
One file per stack, in its own folder. Independent stacks can be updated, backed up and rebuilt without touching each other, and a broken file takes down one app instead of your whole setup. Group only services that genuinely belong together, like an app and its database.
What is the difference between an image tag and a version pin?
A tag like :1 or :latest is a moving label the publisher re-points at new builds; a specific tag like :1.24.6 identifies one exact release. Floating tags are fine for utilities. For anything holding important data, pin a specific version and change it deliberately, after reading the release notes.
Rather build it visually? The Docker Compose generator assembles a valid file from picks and presets — then come back here to understand every line of it.