

Immich: a self-hosted Google Photos replacement on a NAS
Immich is the closest self-hosted equivalent to Google Photos: automatic phone backup, a fast timeline, face recognition, smart search, shared albums and a map view — all running on your own NAS, on your own disks, with no subscription and no third party scanning your family photos.
Published Nov 17, 2026 · Last updated Nov 18, 2026
That promise only holds if you set it up properly. Immich is not a single app; it is a small stack of containers that work together, and its database is as important as the photo files themselves. Lose the database and you lose albums, face names, sharing and favourites, even if every original file survives. This guide installs the stack the supported way, explains what each part does, and finishes with the two things people most often skip: a real backup, and a safe update routine.
What Immich actually runs
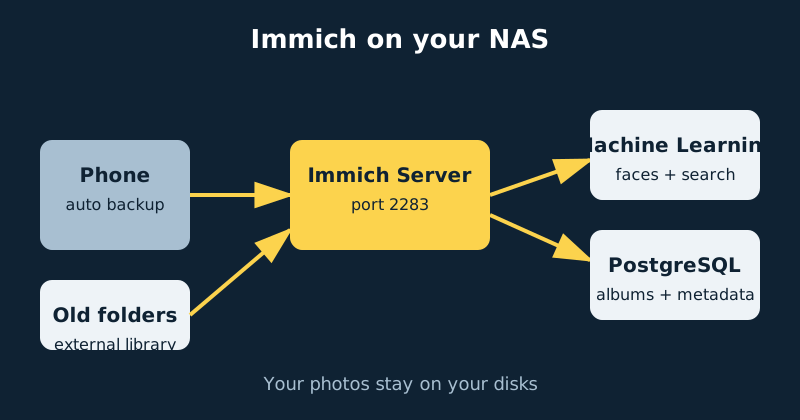
The current Docker Compose stack has four main services. The immich-server container provides the web interface, the API and background jobs, and listens on port 2283. The immich-machine-learning container handles face detection, face recognition and CLIP-based smart search — the feature that lets you search for “beach sunset” or “dog in snow” without tagging anything by hand. A Redis-compatible container (Valkey in recent releases) acts as the job queue between them. Finally, a PostgreSQL database with vector search extensions stores all metadata and the embeddings that make smart search and face matching work. That is why you must use the database image Immich specifies, not a plain Postgres image you happen to have.
What you need
- A NAS or small server running Docker and Docker Compose. A modern Intel-based NAS helps because the same chip can accelerate video transcoding later — but treat that as an optimisation, not a requirement. Immich runs perfectly acceptably on CPU alone, machine-learning jobs included; they simply take longer, especially during the first import. Hardware acceleration for machine learning and transcoding (for example Intel Quick Sync) can speed those jobs up considerably, but support varies with CPU generation and architecture, so check your chip rather than assuming.
- RAM: about 4 GB free as a comfortable floor, and more is better during the first import, when machine learning works through your whole library. On very small machines you can temporarily disable machine learning and enable it later.
- Storage in two places: fast local storage — ideally an SSD — for the Postgres database, and larger storage for the photo library itself. The database folder must not live on a network share; Postgres on an SMB or NFS mount is a known cause of corruption and failed starts.
- A backup destination that is not the same disk: an external drive, a second NAS, or an encrypted cloud bucket.
- The official files: download the
docker-compose.ymland example.envfrom the Immich release page rather than copying a random compose file from a blog, because service names and database images change between versions.
Step-by-step installation
- Create the folders. Make a folder for Immich, with a subfolder for uploads and a separate local folder for database data. Note the full paths; you will put them in the
.envfile asUPLOAD_LOCATIONandDB_DATA_LOCATION. - Download the official compose and env files into that folder, and pin a version. Set
IMMICH_VERSIONto a specific release rather than a floating tag, so an overnight restart never silently upgrades you. - Set a strong database password in the
.envfile, and set your time zone. Keep this file private — it contains the only database credential. - Start the stack with
docker compose up -d, then watch the logs. The first start creates the database schema and downloads machine-learning models, so give it several minutes before assuming it is stuck. - Open the web interface at
http://your-nas-address:2283and create the first account. That first account is the administrator. Use a long, unique password and store it in a password manager. - Create accounts for each person in the household instead of sharing one login. Each user gets their own library and timeline, and you can then share albums between accounts — and optionally enable partner sharing so two people see one combined library.
- Install the Immich mobile app (iOS or Android), sign in to your server address, and turn on automatic backup. Choose which albums to back up, whether uploads may use mobile data, and whether backup runs only while charging if battery matters to you.
- Do a small test first. Take ten photos, confirm they appear in the timeline with the right dates and locations, then check they exist as files in the upload location. Only then start a bulk import.
- Import an existing library carefully. If your photos already live in folders on the NAS, add them as an External Library instead of re-uploading: mount the folder read-only into the server container, then create the library under Administration › External Libraries and scan it. Immich indexes those files in place without moving or duplicating them. For a Google Photos export, use the project’s recommended import tooling for Takeout files so dates and albums survive the move.
- Set up remote access safely. Do not port-forward port 2283 to the internet. Use a VPN-style connection such as Tailscale, or a properly configured HTTPS reverse proxy, so logins and uploads stay encrypted and the admin interface is not exposed to scanners.
A concrete configuration example
You normally keep the official compose file untouched and customise the .env file beside it. A typical .env looks like this:
# .env — keep this file private, it holds the database password
IMMICH_VERSION=v3.4.1
UPLOAD_LOCATION=/volume1/immich/library
DB_DATA_LOCATION=/volume1/docker/immich/postgres
DB_PASSWORD=use-a-long-random-password-here
DB_USERNAME=postgres
DB_DATABASE_NAME=immich
TZ=Etc/UTC
The version shown, v3.4.1, was the current release when this guide was last updated — check Immich's GitHub releases page and set IMMICH_VERSION to the newest release listed there. Keep it pinned to one specific release rather than a floating tag: Immich changes substantially across major versions, so always read the release notes before raising the pin, and back up (next section) before you upgrade.
To add an external library, you add one read-only volume line to the immich-server service in the compose file, recreate the container, and then create the library in the admin interface pointing at that internal path:
    volumes:
      - ${UPLOAD_LOCATION}:/data
      - /volume1/photos-archive:/mnt/archive:ro
The :ro matters. Read-only means Immich can index and display those photos but can never move, rename or delete your only copy while you are still deciding how you want the archive organised. Remember, though, that files in an external library are managed by you, not by Immich — they are not uploads the app controls. If you move, rename or delete the source files on the NAS yourself, the library entries break or the photos vanish from Immich. The read-only mount protects the archive from Immich; only your own care protects it from changes made outside Immich.
Backups: files plus database, together
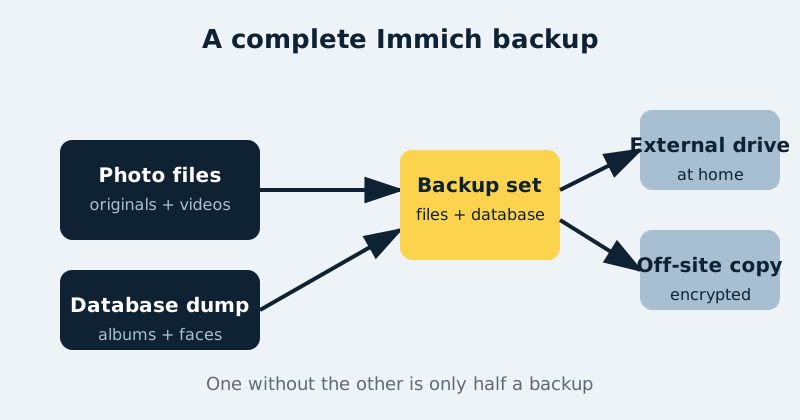
Immich writes scheduled database backups into the library’s backup folder, and you should also take your own. A complete backup has three parts: the original photo and video files, a dump of the Postgres database, and a copy of your .env and compose files so you can recreate the exact stack. Test the restore once on a spare machine or a second stack with different ports. A backup you have never restored is a hope, not a backup. Keep at least one copy off the NAS itself, because theft, fire and a failed RAID controller do not care that the files were “backed up” to the same box.
Backing up and restoring the database, step by step
Because the database half is the one people fumble, here is the explicit procedure. From the folder holding your compose file, dump the whole database to a single SQL file:
docker compose exec -T database pg_dumpall -c -U postgres > immich-dump.sqlStore immich-dump.sql with the photo backup set — ideally in the copy that lives off the NAS. To restore, install a fresh stack using the same Immich version that produced the dump, let the database container start, stop the server and machine-learning containers, and import the dump:
docker compose exec -T database psql -U postgres < immich-dump.sqlThen start the rest of the stack and sign in — your accounts, albums and face names come back with the dump. The version consistency matters: restore into the same release that created the dump, and only upgrade afterwards. A dump restored into a much older or newer stack can fail its schema migrations and leave you debugging instead of restored.
Common mistakes and troubleshooting
The stack starts, then the database container loops or exits
Usually the database data folder is on a network share, has the wrong ownership, or a plain Postgres image was substituted for the image Immich specifies with its vector extensions. Move DB_DATA_LOCATION to local storage, check the logs of the database container first — not the server — and compare your compose file against the official one for your version.
Faces and smart search never finish
The first scan of a large library can take days on a small CPU, and that is normal. Check the Jobs page in the admin interface: if jobs are progressing, leave it alone and let it run overnight. If they are stuck at zero, the machine-learning container is usually unhealthy, out of memory, or unreachable from the server container. Its logs will say which.
Phone uploads stall on iOS
iOS restricts background work aggressively. Open the app periodically during a large first backup, keep the phone on Wi-Fi and charging, and expect the initial upload to be a foreground task. Android is more forgiving, but battery-optimisation settings can also pause uploads until you exempt the app.
An update broke something
Immich moves fast and some releases include breaking changes that require a specific upgrade step. Read the release notes before every update, back up first, and never let anything auto-update this stack. If a new version fails, your pinned previous version plus the pre-update database dump is the way back.
Official documentation and references
- Immich documentation — installing with Docker Compose
- Immich documentation — backup and restore guidance
- Immich documentation — libraries and external libraries
- Immich documentation — the official docs home
- Immich on GitHub — the official repository and releases
Frequently asked questions
Can Immich replace Google Photos completely?
For backup, timeline browsing, search, face recognition and sharing, yes — those are its core features. What you take on yourself is the operations work Google used to do: disk failures, backups, updates and remote access are now your job. Most people find that a fair trade for keeping originals at full quality under their own control.
Should I upload my old folders or use an external library?
Upload (or use the import tooling) for photos you want Immich to manage long-term, including phone backups. Use an external library for a large, already-organised archive you do not want duplicated or moved. You can run both at once: managed uploads for new photos, read-only external libraries for the historical archive.
How much storage do I need?
Add it up in parts rather than with a single multiplier. Start with your original photo and video library. Add thumbnails and other generated assets — Immich keeps several derived sizes of every photo. Add transcoded video versions if you enable transcoding; for large video libraries they can rival the originals. Then add a growth allowance for the photos you have not taken yet. Count backup capacity separately: a backup needs roughly the library plus a database dump again, and a backup that lives on the same NAS is not protection against losing the NAS itself — keep at least one copy elsewhere.
Library feeling slow? Turn on the GPU: Immich hardware acceleration.