

Home Assistant Backups: The 3-2-1 Strategy That Actually Restores
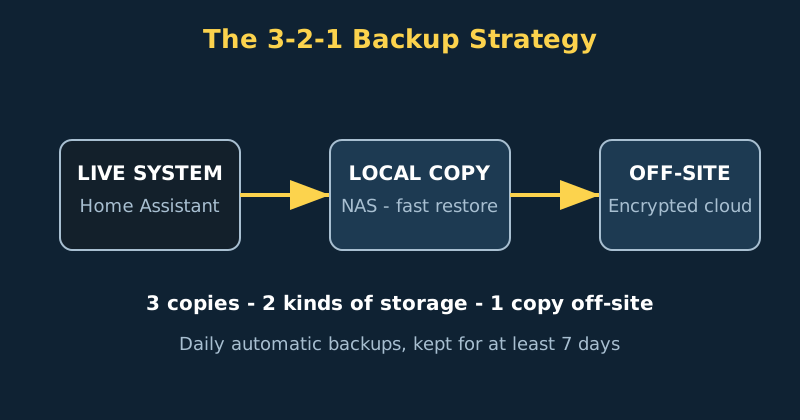
A backup you have never restored is a hope, not a backup. Home Assistant makes it easy to create backup files and surprisingly easy to discover, months later, that they are incomplete, unencrypted in the wrong place, or stored on the same drive that just died. This guide builds a simple 3-2-1 system — three copies, on two different kinds of storage, with one copy off-site — and then proves it works with a real restore test.
Published Nov 17, 2026 · Last updated Nov 18, 2026
The 3-2-1 rule comes from professional data protection, but it fits a smart home perfectly. Your Home Assistant instance holds hundreds of hours of work: automations, dashboards, device pairings, energy history and add-on data. Rebuilding that from memory after a failed SD card or a corrupted update is miserable. Rebuilding it from a tested backup takes under an hour.
What you need
- A running Home Assistant instance — any install type works, though backup options differ slightly between Home Assistant OS, Supervised, Container and Core.
- A second local storage target — a NAS share, a USB drive attached to another machine, or a second computer on your network.
- An off-site destination — an encrypted cloud folder, a drive stored at a relative's house, or a backup service you control. The destination matters less than the fact that it is not in the same building.
- A password manager — to store your backup encryption key. If you lose that key, an encrypted backup is unrecoverable by design.
- About 45 minutes for the first setup, plus 30 minutes for the restore test.
Step-by-step: build the system
- Take a manual full backup first. Go to Settings, then System, then Backups, and create a full backup before you change anything. What a backup contains depends on the backup type, your installation method and the folders you select: a full backup can include your configuration, add-ons and their data, media and share folders, while the automatic setup lets you pick folders — and many setups exclude media and share to keep backup files small. Download it to your computer and confirm the file size looks sensible — a healthy system is usually hundreds of megabytes, not a few kilobytes. This file is your safety net while you set everything else up.
- Turn on encryption and save the key properly. Home Assistant can encrypt backups with a key it generates for you. Enable encryption, then copy the emergency kit or encryption key into your password manager immediately, and ideally print a copy for a fireproof location. Test that you can find the key again before you rely on it. An encrypted backup stored off-site protects the sensitive details inside it, including network names, device information and tokens.
- Set an automatic schedule you will not outgrow. Configure automatic backups daily, and keep at least seven daily copies locally. Daily matters because the most common restore reason is not a dead drive — it is a bad automation edit, a broken update or an add-on change you want to undo. A week of history lets you step back to before the change without losing a month of other work. Avoid backing up at the exact moment recorders and databases are busiest if your system struggles overnight.
- Add a local network storage target. In Settings, then System, then Storage, add a network storage location of type Backup and point it at a NAS share or another always-on machine. Then set that location as a backup destination. Local network copies restore fast, which is what you want for the common cases: a failed update at 9 pm should be a 20-minute fix, not an overnight download.
- Add the off-site copy. Use an official or community backup integration for your chosen cloud provider, a scheduled sync from your NAS to cloud storage, or a weekly manual upload if your system changes slowly. The rule is that at least one recent, encrypted backup must leave the house automatically. If the step requires you to remember it every week, it will eventually be three months out of date when you need it.
- Decide what does not belong in the backup. Huge media folders and long-term recorder history can make backups enormous and slow. It is reasonable to exclude bulky media you can re-download, but never exclude add-on data for things like Zigbee or Z-Wave coordinators, password managers, or anything whose loss means re-pairing devices or losing secrets. When in doubt, keep it in and buy storage instead — storage is cheaper than re-pairing forty devices.
- Label your restore points before big changes. Before a major Home Assistant update, a migration to new hardware, or a big automation rewrite, take a manual backup with a clear name such as “before 2026.11 update” or “before dashboard rebuild”. Automatic backups protect you from accidents; named backups protect you from your own planned experiments, and they are much easier to find under stress.
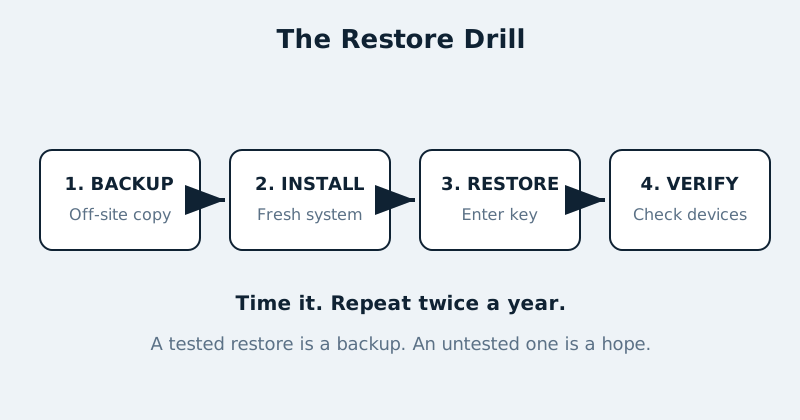
- Run a restore test on spare hardware or a virtual machine (the Home Assistant OS flow). On HAOS, install a fresh copy of Home Assistant, choose the restore option during onboarding, select your off-site encrypted backup, and enter the key from your password manager. Time it. Check that automations, add-ons and a sample of devices come back. If anything is missing, fix the backup settings now, while the original system is still healthy. Repeat this test twice a year.
Running Home Assistant in a container? Your restore differs from the HAOS flow above: there is no restore option during onboarding. Backups are ordinary files in the backup directory (the backups folder inside your config volume). Copy the backup file you want into that folder on the new install, then restore it from Settings, then System, then Backups. Everything else in this guide — the 3-2-1 layout, encryption and the restore drill — applies unchanged.
A useful automation: warn me when backups fail
The most dangerous backup failure is a silent one. Monitor the right signal: the Backup integration provides a dedicated timestamp sensor for the last successful automatic backup, and fires an event when an automatic backup fails. One warning about a common pattern you will see in forum posts: do not check the age of the backup manager's state sensor via its last_changed timestamp. That timestamp records when the sensor's state last changed — a status flip, not a completed backup — so it can make a healthy system look stale or, worse, a broken one look fine. Age-check the success timestamp instead. Adapt the entity IDs to your own system:
automation:
  - alias: "Warn if no recent successful backup"
    trigger:
      - platform: time
        at: "09:00:00"
    condition:
      - condition: template
        value_template: >-
          {{ (now() - (states('sensor.backup_last_successful_automatic_backup')
             | as_datetime)).days >= 2 }}
    action:
      - service: notify.mobile_app_your_phone
        data:
          title: "Home Assistant backup check"
          message: "No successful automatic backup in 2 days. Check Settings > System > Backups."
    mode: single
For failures themselves, trigger on the Backup integration's failure event so you hear about a broken backup the night it happens, not at the next weekly check:
automation:
  - alias: "Alert when an automatic backup fails"
    trigger:
      - platform: event
        event_type: backup_automatic_backup_failed
    action:
      - service: notify.mobile_app_your_phone
        data:
          title: "Home Assistant backup failed"
          message: "The last automatic backup failed. Check Settings > System > Backups."
    mode: single
If your entity ID differs, find the timestamp sensor under Settings, then Devices & services, then Backup — the pattern is the same: check daily, notify only when the last successful backup is older than your schedule allows.
How long should you keep backups?
A practical retention pattern for most homes is seven daily backups, four weekly backups and three monthly backups on the local target, with a similar or slightly shorter set off-site. That gives you fast recovery from recent mistakes and a way back from a problem you only notice weeks later, such as slow database corruption or an automation that has been misfiring since an update. Watch total size after the first month and adjust — retention you cannot store is retention you do not have.
One more distinction matters: a backup is not the same as a snapshot of a virtual machine or a copy of a Docker volume, though those can complement it. Home Assistant backups are portable between install types in a way a raw disk image is not, which is exactly what you want when the replacement hardware differs from the original.
Common mistakes and troubleshooting
- Backups stored only on the same drive. If the SD card or SSD dies, the backups die with it. Move at least one copy to another device today, even before you automate anything.
- Lost encryption key. There is no recovery and no support ticket that can undo this. Store the key in a password manager and on paper in a separate location.
- Restore fails partway. Usually this means a corrupt file or a version gap. Try the next most recent backup, restore onto a fully updated fresh install, and check available disk space — a restore needs room for both the backup and the extracted result.
- Backups keep getting bigger. Check recorder history length and media folders first. Shortening recorder retention or excluding re-downloadable media usually fixes growth without weakening protection.
- Add-on data missing after restore. You likely took a partial backup, or your automatic setup excludes the folders that data lives in. Make sure your scheduled backups include add-ons and the folders you actually need, and reserve partial backups for quick experiments only.
Official documentation and references
- Home Assistant — Backup integration documentation
- Home Assistant documentation — common tasks for Home Assistant OS, including backups
- Home Assistant Cloud — encrypted cloud backup storage
FAQ
How often should Home Assistant back itself up?
Daily is the right default for most homes. Your system changes more often than you think — new devices, edited automations, updated add-ons — and daily backups are small and cheap compared with losing a week of changes. Add a manual named backup before every major update or migration.
Can I restore a backup onto different hardware?
Yes, and that is one of the best reasons to use Home Assistant's own backup system rather than only disk images. Restore during onboarding on the new hardware, then reconnect coordinators and check integrations that depend on IP addresses or USB paths, which may need a quick adjustment.
Should my off-site backup be encrypted?
Yes, always. A Home Assistant backup contains a detailed map of your home, your devices and often tokens or credentials for integrations. Encryption costs you nothing except storing one key carefully, and it means a breach of the storage provider does not become a breach of your house.