

Nextcloud on a NAS: your own cloud drive
Nextcloud is the self-hosted answer to Google Drive and Dropbox: file sync and sharing, a web interface for documents and photos, calendars and contacts, and desktop and mobile clients — all running on your NAS, on disks you own, with no storage subscription and no third party reading your files.
Published Nov 17, 2026 · Last updated Nov 18, 2026
It is also the heaviest thing in this category, and it rewards a proper install. Nextcloud is a PHP web application backed by a real database, and the difference between a snappy private cloud and a sluggish, warning-filled one is almost always the same three things: a proper database instead of the default file-based one, a Redis cache, and background jobs running on a schedule instead of whenever someone happens to load a page. This guide installs all three from the start, then covers the two configuration steps everyone trips over — trusted domains and running behind a reverse proxy.
What the stack looks like
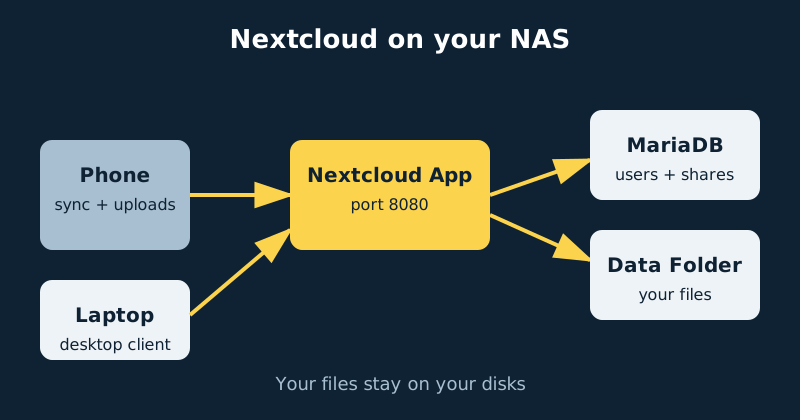
The Compose stack below has four services. The app container is the official Nextcloud Apache image: the web interface, the sync API your clients talk to, and the admin settings, listening on port 8080. MariaDB stores users, shares, file metadata and app data — every file listing you see is a database query, which is why the database choice matters so much. Redis handles file locking and caching, so two clients syncing at once do not corrupt each other’s view of a folder. Finally, a cron container runs Nextcloud’s background jobs — thumbnail generation, trash cleanup, update checks — every five minutes, instead of piggybacking on page loads.
What you need
- A NAS or small server running Docker and Docker Compose, with at least 2 GB of RAM free for the stack — more if you plan to add document editing later.
- Fast storage for the database. Like any database, MariaDB wants local storage, ideally an SSD volume — never a network share.
- Room for the data folder. This is your actual cloud drive: size it for everything you plan to sync, plus version history and deleted-file retention, which Nextcloud keeps by default.
- A name and address plan. Decide now how you will reach it: a local IP, a hostname on your network, or a domain name through a reverse proxy. Nextcloud cares about this more than most apps, as the trusted-domains step below shows.
- A backup destination that is not the same disk, for both the data folder and database dumps.
Step-by-step installation
- Create the folders. Make a folder for the stack with subfolders for the database and the application files — for example
/volume1/docker/nextcloud/dband/volume1/docker/nextcloud/html. Your synced files will live inside the application folder’sdatadirectory, which keeps the whole install in one place to back up. - Write the compose file from the example below, and change every password in it. The database passwords appear twice (once for MariaDB, once for the app) and must match exactly.
- Start the stack with
docker compose up -dand give the first start a few minutes: MariaDB initialises, then Nextcloud installs itself using the admin account from the compose file. - Open the web interface at
http://your-nas-address:8080and sign in with the admin user you set. If you instead get a page saying you are accessing through an untrusted domain, that is the trusted-domains protection working — see the next step. - Set your trusted domains. Nextcloud only answers requests for hostnames on its list, which stops a whole class of host-header attacks. The compose example sets the list at install time via
NEXTCLOUD_TRUSTED_DOMAINS. To change it later, rundocker compose exec -u www-data app php occ config:system:set trusted_domains 1 --value="cloud.example.com", adding each address you use — local IP, local hostname and public domain all count separately. - Create a personal account for yourself and use that for daily syncing, keeping the admin account for administration only. Add accounts for anyone else who will use it rather than sharing logins; sharing between accounts is built in.
- Check the admin warnings. Open Settings › Administration › Overview. A clean install with this stack should show very few warnings. The page is also where you confirm background jobs are set to Cron — the cron container handles them, so jobs run even when nobody is browsing.
- Install the sync clients. The desktop client (Windows, macOS, Linux) syncs chosen folders both ways, supports selective sync and virtual files, and is the closest match to the Dropbox experience. The mobile apps add automatic camera uploads. Sign each in with your personal account, ideally using an app password created under Settings › Security rather than your main password.
- Put it behind HTTPS before remote use. On your home network only, plain HTTP works, but do not expose that to the internet. Either reach it through a VPN such as Tailscale, or put a reverse proxy with a real certificate in front and forward the right headers — the configuration notes below cover the three settings that make Nextcloud behave correctly behind a proxy.
- Set up backups before you rely on it. Schedule regular database dumps, and back up the data folder and the stack’s configuration alongside them. A snapshot of the whole stack folder can supplement that, but it is not a substitute for a dump. The notes at the end of this guide explain what a restore actually needs.
A concrete configuration example
This compose file is a complete, working starting point. Change the passwords, the folder paths and the trusted domains to your own, and set TZ to your time zone:
services:
  db:
    image: mariadb:11.4
    command: --transaction-isolation=READ-COMMITTED --log-bin=binlog --binlog-format=ROW
    restart: unless-stopped
    volumes:
      - /volume1/docker/nextcloud/db:/var/lib/mysql
    environment:
      MYSQL_ROOT_PASSWORD: change-this-root-password
      MYSQL_PASSWORD: change-this-db-password
      MYSQL_DATABASE: nextcloud
      MYSQL_USER: nextcloud

  redis:
    image: redis:alpine
    restart: unless-stopped

  app:
    image: nextcloud:apache
    restart: unless-stopped
    ports:
      - "8080:80"
    depends_on:
      - db
      - redis
    volumes:
      - /volume1/docker/nextcloud/html:/var/www/html
    environment:
      TZ: Etc/UTC
      MYSQL_HOST: db
      MYSQL_DATABASE: nextcloud
      MYSQL_USER: nextcloud
      MYSQL_PASSWORD: change-this-db-password
      REDIS_HOST: redis
      NEXTCLOUD_ADMIN_USER: admin
      NEXTCLOUD_ADMIN_PASSWORD: change-this-admin-password
      NEXTCLOUD_TRUSTED_DOMAINS: "192.168.1.50 cloud.example.com"

  cron:
    image: nextcloud:apache
    restart: unless-stopped
    entrypoint: /cron.sh
    depends_on:
      - db
      - redis
    volumes:
      - /volume1/docker/nextcloud/html:/var/www/html
    environment:
      TZ: Etc/UTC
      MYSQL_HOST: db
      MYSQL_DATABASE: nextcloud
      MYSQL_USER: nextcloud
      MYSQL_PASSWORD: change-this-db-password
      REDIS_HOST: redis
Behind a reverse proxy, Nextcloud also needs to know the public address and that the original connection was HTTPS, or share links and client logins misbehave. Add these lines to config/config.php inside the application folder. The trusted_proxies value must be the address of your reverse proxy: find the proxy container’s IP address on the Docker network it shares with Nextcloud (for example with docker inspect), or, if the proxy’s address can move within a small dedicated subnet, trust only that narrow subnet:
  'trusted_proxies' => ['172.20.0.2'],
  'overwriteprotocol' => 'https',
  'overwritehost' => 'cloud.example.com',
Those three lines are the difference between a proxy setup that works and one where the desktop client loops on login or every shared link points at an internal address nobody outside can open.
Do not widen that first line into a broad range. An earlier version of this guide used 172.16.0.0/12, which trusts over a million private addresses — and Nextcloud gives trusted proxies special treatment: it believes the client IP address and protocol they report and uses them in access-control decisions. Trusting a range that wide means trusting every container or device that could ever hold one of those addresses. One proxy address, or at most a narrow subnet containing only your trusted proxy infrastructure, is the correct scope; there is no universal value that is right for every install, so substitute your own proxy’s address for the example above.
Backups, and when Nextcloud is overkill
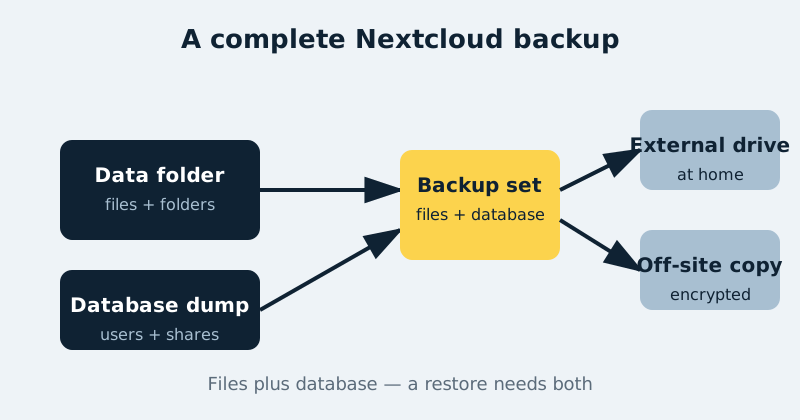
A Nextcloud backup is two things taken together: the data folder (the files themselves) and a database dump (users, shares, calendars, and the index of what is what). Files without the database restore as an anonymous pile of folders; the database without the files restores an elegant index of nothing. The database dump is the centre of the recovery procedure: a restore means loading a dump and pairing it with the data folder and configuration from the same point in time. Do not treat a snapshot of the stack folder as the database backup — a filesystem copy of a running MariaDB data directory can catch the database mid-write, and is not automatically a consistent, restorable backup. Snapshot the stack folder nightly if your NAS supports it, by all means, but treat that snapshot as a supplement that protects your configuration and data files; the scheduled dump is the piece recovery actually stands on. Keep one copy of both off the NAS, and test the complete restore — dump loaded, data folder in place, logins working — into a spare stack before you need it for real.
Be honest about whether you need Nextcloud at all. If all you want is folders kept in sync between your own computers, Syncthing does that with no server, no database and almost no maintenance. If the real goal is photos, Immich is a far better photo experience than Nextcloud’s photo features. Nextcloud earns its keep when you want the whole bundle — shared links for other people, web access to files from any browser, calendars and contacts, and optional extras like in-browser document editing (which needs an additional Collabora or ONLYOFFICE container and a few more gigabytes of RAM). Pick it for the bundle, not for any single feature.
Common mistakes and troubleshooting
“Access through untrusted domain”
You reached Nextcloud by an address that is not on its list — a different IP, a new hostname, or the proxy’s name. Add the exact address with the occ config:system:set trusted_domains command from the installation steps. This is a security feature, not a bug; do not disable it.
Login loops or wrong links behind a reverse proxy
Almost always the three proxy settings above are missing, so Nextcloud thinks requests arrive over HTTP at an internal name. Add trusted_proxies, overwriteprotocol and overwritehost, then clear your browser cookies for the domain and sign in again.
Large uploads fail partway
Something between the client and Nextcloud has a size limit — most often the reverse proxy’s request-body limit, sometimes a tunnel provider’s. Raise the proxy’s limit to match what you actually upload, and prefer the desktop client for very large files, since it uploads in chunks and resumes.
The interface is slow and the admin page complains
Work through the Overview warnings in order: they will point at missing database indexes (fixable with one occ db:add-missing-indices command), background jobs set to AJAX instead of Cron, or a missing memory cache — which this stack’s Redis container already provides once the compose file above is used unchanged.
Official documentation and references
- Nextcloud documentation — the server admin manual
- Nextcloud documentation — backup guidance for administrators
- Nextcloud on GitHub — the official Docker image
- Nextcloud documentation — the user manual
Frequently asked questions
Is Nextcloud really free?
Yes. The server, desktop clients and mobile apps are open source and free for home use, with no storage limits beyond your own disks. Paid plans exist for businesses that want vendor support; nothing in this guide needs one.
Can Nextcloud replace Google Drive or Dropbox completely?
For sync, sharing and web access, yes — those are its core features, and the desktop client feels familiar within a day. What changes is responsibility: disk failures, updates and backups are yours now, and real-time collaborative editing needs the extra office container rather than being built in.
How much maintenance does it need?
Less than its reputation suggests, if you update deliberately. Nextcloud releases a major version a few times a year; read the admin Overview page first, back up, then upgrade one major version at a time rather than skipping several. Ten minutes a month is a realistic budget for a home install.