

Plex Media Server on a NAS, set up properly
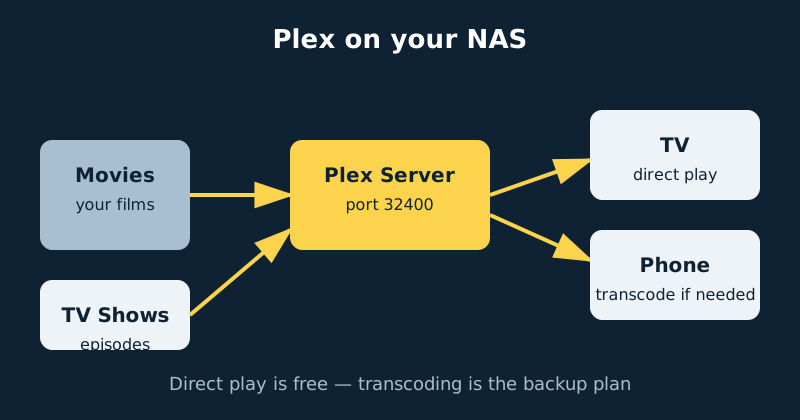
Plex turns a folder of video files on your NAS into a streaming service of your own: polished apps on every TV, phone and tablet, rich artwork and metadata, watch history that follows you between devices, and sharing with family — all streamed from media you own, stored on your own disks.
Published Nov 17, 2026 · Last updated Nov 18, 2026
A NAS is the natural home for it, but two decisions make or break the experience. The first is transcoding: when a client cannot play a file directly, Plex converts it on the fly, and doing that in software will humble most NAS CPUs — while the integrated GPU in a typical Intel NAS chip does it almost for free, if you pass it through to the container and have the right licence. The second is remote access: Plex offers several ways to watch away from home, and they differ a lot in security and reliability. This guide installs Plex in Docker, wires up hardware transcoding, sets naming rules that make libraries organise themselves, and then walks through the remote options honestly.
How Plex decides to play something
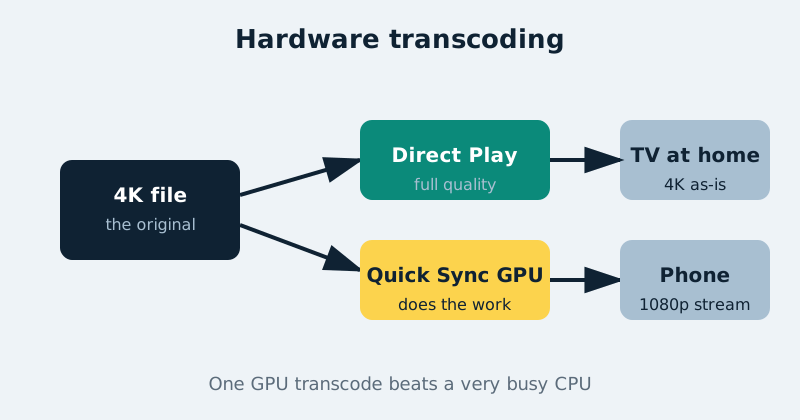
Every time you press play, Plex picks one of three paths. Direct Play sends the file as-is — no CPU cost, full quality. Direct Stream repackages the same audio and video into a container the client prefers, which costs almost nothing. Transcoding actually converts video or audio, and it is the only expensive path: one 4K-to-1080p software transcode can pin a small NAS processor by itself. This guide aims to make Direct Play the norm at home, and hardware transcoding cheap insurance for the times it cannot be.
What you need
- A NAS running Docker and Docker Compose. For hardware transcoding you want an Intel processor with Quick Sync — the integrated GPU found in most Intel-based NAS models. AMD and ARM boxes can still run Plex well for Direct Play.
- A Plex account (free). The server signs in to your account so your apps can find it.
- Your media, organised in folders — one top folder for movies, one for TV, ideally separate from your downloads and backups.
- Fast storage for Plex’s config folder. It holds the metadata database and artwork for your whole library and grows to gigabytes; an SSD volume keeps browsing snappy.
- A Plex Pass, if you want hardware transcoding or remote streaming. Both are paid features since Plex’s 2025 changes — more on this below, because it affects whether Plex or an alternative suits you.
Step-by-step installation
- Get a claim token. Sign in at plex.tv and open
plex.tv/claim. The token ties the new server to your account and expires after a few minutes, so grab it right before the first start. - Create the folders. Make a config folder for Plex (for example
/volume1/docker/plex/config) and note where your media lives (for example/volume1/mediawithMoviesandTVsubfolders). - Write the compose file from the example below, pasting in the claim token. It uses host networking — Plex’s simplest and most reliable mode on a home network — and passes the Intel GPU device into the container.
- Start it with
docker compose up -d, wait a minute, and openhttp://your-nas-address:32400/web. You should land on your own server, already claimed by your account. If you see a generic sign-in with no server, the claim token had expired; generate a fresh one and recreate the container. - Name your server and turn off what you do not need. In Settings, give the server a recognisable name. Consider disabling Plex’s own free streaming extras and discovery rows if you only want your library — the interface is calmer for it.
- Add libraries, one type at a time. Create a Movies library pointing at
/media/Moviesand a TV library at/media/TV. Keep music and photos in their own libraries if you use them. Let the first scan finish before judging performance — matching and artwork download is the busiest Plex ever gets. - Follow the naming rules. Movies:
Movie Name (Year).mkv, in their own folder if you keep extras or subtitles alongside. TV:Show Name/Season 01/Show Name - s01e02.mkv. Files named this way match correctly near enough every time; files named like release groups do not, and no setting fixes that as reliably as renaming. - Enable hardware transcoding. In Settings › Transcoder, tick Use hardware acceleration when available and Use hardware-accelerated video encoding. Then play something on a phone with the quality set below the file’s resolution and check the Dashboard: a (hw) marker next to the transcode confirms the GPU is doing the work, not the CPU.
- Set library housekeeping. Under Settings › Library, enable automatic and periodic scans so new files appear on their own, and let Plex empty trash after scans only if your media drives are always mounted — otherwise a temporarily missing drive can wipe a library’s metadata.
- Decide on remote access using the comparison in the next section, and set it up deliberately rather than accepting whichever default happened to work.
A concrete configuration example
This compose file runs the official Plex image with host networking and Intel GPU passthrough. Replace the claim token, set your own time zone, and adjust the paths:
services:
  plex:
    image: plexinc/pms-docker:latest
    container_name: plex
    restart: unless-stopped
    network_mode: host
    environment:
      TZ: Etc/UTC
      PLEX_CLAIM: "claim-xxxxxxxxxxxxxxxxxxxx"
    volumes:
      - /volume1/docker/plex/config:/config
      - /volume1/media:/media
    devices:
      - /dev/dri:/dev/dri
Two notes on that example. First, /dev/dri only exists on Intel systems with the integrated GPU enabled — if your NAS lacks it, delete the devices block and Plex will fall back to software transcoding. Second, host networking means there is no ports list: Plex binds port 32400 directly on the NAS, which is what its discovery and remote-access features expect.
Remote access: the options and their trade-offs
Plex’s built-in remote access (a port forward to 32400, with Plex’s servers brokering the connection) is the easiest route and the only one the phone apps use seamlessly. Since 2025 it requires the server owner to hold a Plex Pass; viewers you share with are covered by your pass, while a household member streaming from their own server without one needs a cheaper Remote Watch Pass. The trade-off is trust: a port is open on your router, so keep Plex updated and use a strong account password with two-factor authentication.
Update, 2026: the requirement arrived platform by platform rather than all at once. It began with the updated mobile, desktop, web and Roku apps, and from March 2026 it also applies on smart TVs (Samsung, LG, Vizio and others) and the PlayStation and Xbox console apps, with the remaining platforms following. Whose pass counts is worth stating precisely: if the server owner holds a Plex Pass, every account they share that server with can stream remotely from it at no extra cost; a Remote Watch Pass, by contrast, covers only the account that bought it, letting that one account stream remotely from servers it has access to. Plex keeps the current platform list in its remote playback requirements. Streaming on your home network is unaffected, as are music and photos.
Plex Relay is the fallback when a direct connection fails: traffic routes through Plex’s servers, capped at low bitrates (1–2 Mbps). It works as a fallback for limited-quality playback, and a stream landing on Relay is a useful clue when diagnosing a remote-connectivity problem — but at that bitrate it is no substitute for a properly configured direct connection for quality video.
VPN access — watching through Tailscale or a similar mesh VPN — opens no ports at all and is the most private option. The cost is convenience: every viewing device must run the VPN client, and Plex may treat the stream as local or remote depending on how subnets line up. For family sharing with non-technical viewers, built-in remote access usually wins; for your own devices, the VPN is hard to beat.
Common mistakes and troubleshooting
The server never appears, or “No soup for you”
The claim step failed — usually an expired token, or you opened the web interface through a different address than the server expects. Generate a new claim token, update the compose file, and recreate the container. Opening http://nas-ip:32400/web directly, rather than via app.plex.tv, avoids most first-run confusion.
Transcoding still maxes out the CPU
Check the Dashboard for the (hw) marker during a transcode. If it is missing: confirm the /dev/dri device made it into the container, that hardware acceleration is ticked in settings, and that your account holds a Plex Pass — hardware transcoding silently stays off without one. Also note that burning in subtitles is often a software task even when the video itself is hardware-transcoded.
Remote access shows “not available outside your network”
Work outward: is the port forward on the router pointing at the NAS’s current IP (give the NAS a reserved address)? Is there a second router or ISP gateway in the way creating double NAT? Is your ISP using carrier-grade NAT, in which case no port forward will ever work and the VPN route is your answer?
Buffering on a film that “should” direct-play
Look at what the client actually supports. Subtitle formats, exotic audio codecs and very high bitrates are the usual reasons a TV app asks for a transcode. The Dashboard tells you which element is being converted — fix that rather than upgrading hardware blindly.
Official documentation and references
- Plex Support — quick-start and step-by-step guides for Plex Media Server
- Plex Support — requirements for remote playback of personal media
- Plex Support — the full Plex knowledge base
Frequently asked questions
Do I need a Plex Pass?
For watching on your home network with Direct Play, no — the free server does that well. You need a Plex Pass for hardware transcoding and, since 2025, for streaming remotely from your own server. If those two features matter to you, the pass is effectively the price of Plex now; if they do not, free Plex remains capable.
Plex or Jellyfin — which should I run?
Jellyfin is fully free and open source, with hardware transcoding included at no cost, and it is covered in its own guide on this site. Plex counters with more polished apps on more devices, easier sharing with family, and better handling of large libraries. Many households run Plex for the living room and keep Jellyfin as a capable backup; the media folders can be shared by both.
Can a NAS handle a 4K transcode?
With Quick Sync hardware transcoding, a modest Intel NAS can convert one or two 4K streams comfortably. In software, the same job can overwhelm it with a single stream. That gap is the whole reason the GPU passthrough step matters — and why tone mapping of HDR content is worth testing with your own files before a big movie night.