

Safe Remote Access Compared: Tailscale vs Cloudflare Tunnel vs Reverse Proxy
Everyone reaches the same moment: Home Assistant works beautifully at home, and then you are standing in a car park wanting to check a camera or open the garage. The wrong answer is port forwarding — opening your router so the whole internet can knock on your smart home's door. The three right answers are Tailscale, Cloudflare Tunnel, and a reverse proxy with HTTPS. They differ in who can reach your services, what skills they demand, and what you trust. This guide compares them honestly so you can pick once and move on.
Published Nov 17, 2026 · Last updated Nov 18, 2026
What you need to decide first
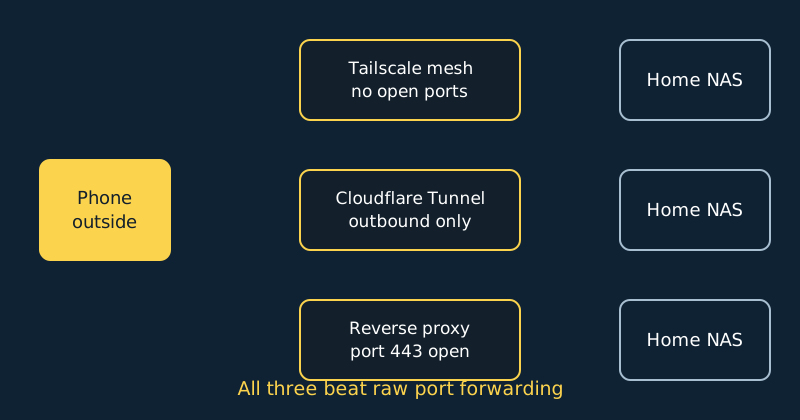
Ask two questions. Who needs access? If it is only you and your household, a private network approach wins. If you need a public link anyone can open — a shared dashboard, a webhook endpoint for a service that cannot join your private network — you need a public route for that one service. What are you exposing? A full network (NAS, printers, every container) suits a mesh VPN. A single web app suits a tunnel or proxy. Most homes end up with Tailscale for themselves plus, at most, one carefully chosen public service.
Option 1: Tailscale — the private mesh
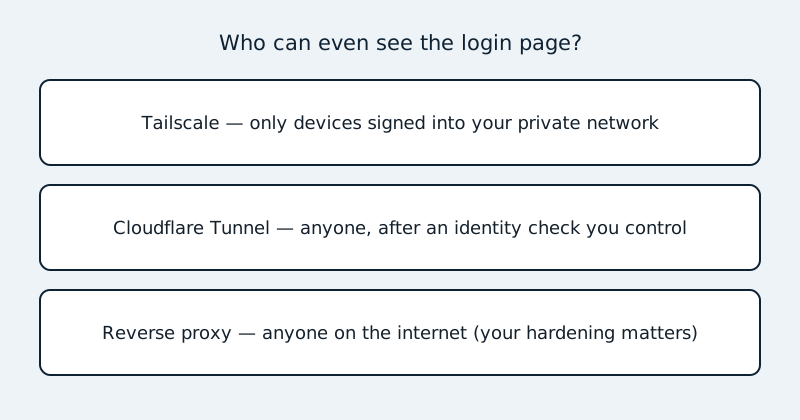
Tailscale builds an encrypted private network (a "tailnet") between your devices using WireGuard. Install it on your phone, laptop, and NAS or Home Assistant machine, sign in, and each device gets a stable private address that works from anywhere. Nothing is public: a device that is not signed into your tailnet cannot even see your services, let alone attack their login pages. Setup is measured in minutes, there are no ports to open and no certificates to manage, and features like subnet routing let one always-on device (the NAS) offer access to your whole home LAN, while exit nodes let you route your traffic home when you are on untrusted Wi-Fi. The trade-offs: every person and device needs the app and an account on your tailnet, some third-party webhooks cannot reach private addresses, and you are trusting Tailscale's coordination service (the traffic itself is end-to-end encrypted; a fully self-hosted alternative, Headscale, exists for the determined). For most households this is the correct default.
Option 2: Cloudflare Tunnel — public access with no open ports
A Cloudflare Tunnel runs a small connector, cloudflared, on your network. It dials out to Cloudflare and holds the connection open, so visitors reach your service through Cloudflare's network without your router opening any inbound port. You get a real public hostname with HTTPS handled for you, and you can put Cloudflare Access in front of it so visitors must pass an identity check before the app's own login even appears. The cautions are real, though. There are two legs to a tunnelled connection, and only one of them is private from Cloudflare: the visitor's browser encrypts its HTTPS connection to Cloudflare's edge, where that connection terminates — Cloudflare can see and process the plain HTTP content there — before forwarding it through the encrypted tunnel to the connector on your network. So the tunnel leg (Cloudflare to your origin) is encrypted, but the content is not end-to-end encrypted between the visitor and your NAS: you are trusting Cloudflare with the content of those sessions. Cloudflare's terms are written around web traffic; the free tunnel service is aimed at HTTP/HTTPS applications, and pushing large non-web traffic such as media streaming through it can breach the terms and perform poorly. And a tunnel makes a service public by design — pair it with Access rules and strong app passwords, never tunnel an admin interface that has no login of its own.
Option 3: Reverse proxy — the classic public route
A reverse proxy such as Nginx Proxy Manager, Caddy, or Traefik sits at your network edge, accepts HTTPS connections on port 443 (the one port you forward from your router), and passes each hostname to the right internal service. Caddy is loved for automatic HTTPS certificates; Nginx Proxy Manager for its friendly web UI. This is the most flexible and most self-reliant option — no third party in the path — and the most demanding: you own certificate renewal (usually automated), proxy updates, and hardening. Your services' login pages are visible to the entire internet, so strong unique passwords, rate limiting or fail2ban, and prompt updates are not optional extras — and treat multi-factor authentication as mandatory, not a nice-to-have: turn on MFA on every exposed service that offers it, and for sensitive apps with no MFA of their own, put an authentication layer such as Authentik or Authelia in front of them, so a single stolen password is never enough to get in. Choose this when you specifically want public access under your own control and are willing to maintain it.
Step-by-step: the recommended Tailscale setup
- Create a Tailscale account and install the app on your phone first, signing in and confirming the phone appears in the admin console's device list.
- Install Tailscale on the always-on home device — many NAS platforms and Home Assistant (via its add-on or app) support it directly; otherwise a small Docker container works.
- On the home device, enable subnet routing for your home LAN range if you want to reach devices that cannot run Tailscale themselves: the device advertises the route, and you must then approve that route in the Tailscale admin console — both halves are required. The subnet router also needs IP forwarding switched on, and on some NAS platforms and operating systems that takes an extra setting or a small configuration change before LAN devices will answer.
- Test from your phone with Wi-Fi off: open your NAS and Home Assistant using their home LAN addresses. If they load over mobile data, the mesh is working.
- Optionally set the home device as an exit node so you can route all phone traffic through home on public Wi-Fi.
- Turn on two-factor authentication for the identity account you use to sign in — it is now a key to your house, so treat it like one.
- Remove any old port-forwarding rules from your router. The most common security failure is a forgotten forward left open beside the new safe route.
A note on configuration
If you put Home Assistant behind a reverse proxy, Home Assistant needs to know, or logins and websockets misbehave. The relevant snippet lives in configuration.yaml:
# configuration.yaml — trust ONLY your actual reverse proxy
http:
  use_x_forwarded_for: true
  trusted_proxies:
    - 127.0.0.1        # a proxy running on the same machine
    - 172.30.0.2       # example only: your proxy's own address — replace with yours
Only ever list the proxy that actually forwards traffic to Home Assistant — Nginx Proxy Manager, Caddy, Traefik, or whatever sits in front of it — ideally as a single address, or the small Docker subnet that proxy lives on. Two warnings matter here. First, a Tailscale client is not a proxy: when your phone connects to Home Assistant directly over the tailnet it is just a client, so never put the Tailscale range (100.64.0.0/10) in this list — if you only ever connect directly or over Tailscale, you may not need a trusted proxy entry at all. Second, anything on this list is allowed to assert who a visitor is via the X-Forwarded-For header, so trusting a broad range lets everything in that range spoof visitor IPs — weakening IP bans and failed-login protections — and wrong entries are a common cause of Home Assistant's "unable to connect" proxy errors. Keep the list tight, and restart Home Assistant after changing it.
Common mistakes and troubleshooting
Port forwarding "just for a day". Days become years. If a service must be public, use the tunnel or proxy properly instead. Tunnelling everything. A tunnel per service, with Access rules, beats one tunnel exposing a dashboard that links to every admin panel you own. Websocket errors in Home Assistant behind a proxy. Your proxy must forward upgrade headers — Caddy and Traefik do this by default; in Nginx-based setups, enable websockets for the host entry. Tailscale connects but LAN devices do not answer. Subnet routes must be both advertised by the home device and approved in the admin console, and the home device must stay awake. Double NAT confusion. If your router sits behind an ISP gateway, proxy port forwards must exist on both boxes — one more reason the no-open-port options are easier at home.
Official documentation and references
- Tailscale knowledge base — subnet routers and approving routes
- Cloudflare documentation — connecting a network with Cloudflare Tunnel
- Home Assistant — the HTTP integration, trusted proxies and forwarded headers
- Nginx Proxy Manager — the official setup and usage guide
FAQ
Which option is best for Home Assistant specifically?
Tailscale, for most people. The Home Assistant apps work happily over it, presence and local control stay private, and there is nothing public to attack. Add a single Cloudflare Tunnel with Access only if you have a concrete need — for example an integration that must call a public webhook URL — and keep everything else on the tailnet.
Is a reverse proxy unsafe?
Not inherently — much of the web runs behind them — but it is the only option here that deliberately shows your login pages to the whole internet, so its safety depends on your maintenance: updates, strong credentials, and two-factor authentication. If that upkeep sounds like a chore you will skip, pick Tailscale and be safer by default.
Can I use more than one of these at once?
Yes, and many homes do: Tailscale for the household, a tunnel for one public service, perhaps a proxy later if needs grow. Just avoid publishing the same service through two public routes, and keep a note of what is exposed where — future you, troubleshooting at midnight, will be grateful.