

Nginx Proxy Manager: an easy reverse proxy with free HTTPS for home services
A reverse proxy turns the ugly reality of home services — http://192.168.1.50:2283, certificate warnings and all — into clean addresses like https://photos.your-domain.com with a valid padlock. Nginx Proxy Manager does that job with a friendly web interface and free Let’s Encrypt certificates, no config files to hand-edit.
Published Nov 17, 2026 · Last updated Nov 18, 2026
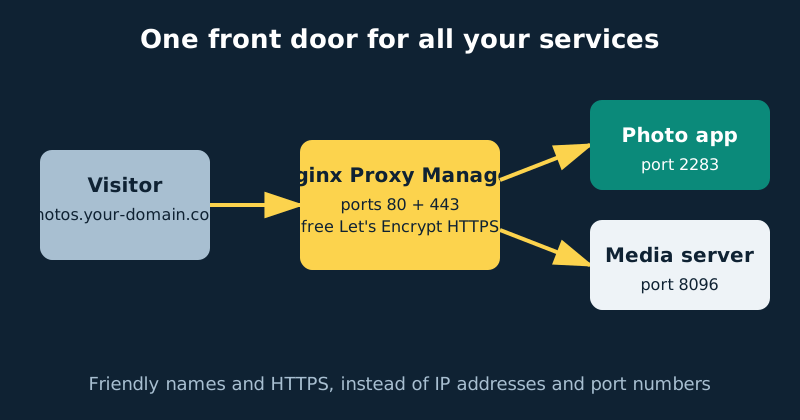
Every service you self-host arrives with its own port number and, usually, no encryption at all. That is tolerable for a week and miserable forever: nobody remembers ports, browsers complain about plain HTTP, and some apps and mobile clients refuse to work properly without HTTPS. A reverse proxy sits in front of all of them as a single front door. Visitors (including you) connect to the proxy by name; the proxy fetches the page from the right app on the right internal port and hands it back over an encrypted connection. Nginx Proxy Manager — NPM for short — wraps the powerful but fiddly Nginx proxy in forms and toggles, and automates the certificate renewals that make HTTPS a chore when done by hand.
How the pieces fit together
Three things have to agree for a service to be reachable by name. DNS points the name at your home’s public IP address (or, for internal-only use, at the NAS’s local address). Your router forwards just two ports — 80 and 443 — to the NAS, where NPM listens. NPM itself matches the incoming name to a proxy host rule: this name goes to that internal IP and port. Certificates come from Let’s Encrypt, a free certificate authority; NPM requests and renews them automatically, proving you control the domain either by answering a challenge on port 80 or by a DNS check with supported providers. The result: one open doorway, every service behind it encrypted, and each app’s own odd port never exposed to the internet at all.
One precision worth having: the encryption ends at NPM. HTTPS protects the leg from the visitor to the proxy, and TLS terminates there — NPM decrypts the request, then fetches the page from the app across your internal network, which in this guide’s own setup is plain HTTP. The proxy-to-app leg is only encrypted if the upstream app is separately configured for HTTPS, which most home services are not. On a trusted home network that is a reasonable and common arrangement, but it is not end-to-end encryption, and it is one more reason the internal network has to be one you actually trust.
What you need
- A NAS running Docker with ports 80 and 443 free — NPM needs to own both, so anything else using them (including a NAS web interface on those ports) has to move or be reconfigured first.
- A domain name you control. A cheap domain with DNS you can edit is the whole foundation; subdomains for services are then free and unlimited.
- Router access to forward ports 80 and 443 to the NAS — or, if you only want tidy names inside your home network, a local DNS setup instead (see the safety section).
- An email address for the Let’s Encrypt account and expiry notices.
Step-by-step installation
- Create the stack folder (
nginx-proxy-manager) with the compose file below, and start it withdocker compose up -d. The default setup uses a built-in SQLite database, which is entirely sufficient for a home install and keeps the stack to one container. - Open the admin interface at
http://your-nas-address:81and sign in with the default credentials — email[email protected], passwordchangeme. NPM forces you to change both immediately. Do it, and store the new password in a password manager. - Point DNS at your home. At your DNS provider, create an A record for each service name (for example
photos) pointing to your home’s public IP — or one wildcard record,*, covering all subdomains at once. If your home IP changes, use a dynamic DNS hostname and CNAME your records to it. - Forward the ports. In your router, forward TCP 80 and TCP 443 to the NAS’s local address. Nothing else. NPM is now the only thing the internet can reach.
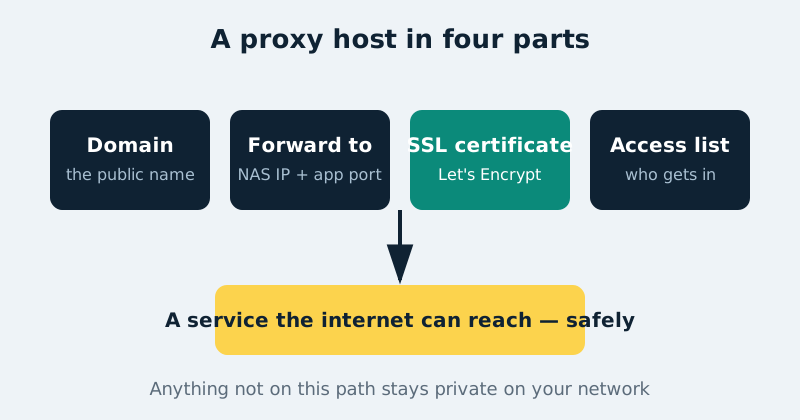
- Create a proxy host. In NPM: Hosts › Proxy Hosts › Add. Domain name:
photos.your-domain.com. Scheme:http. Forward hostname: your NAS’s local IP (or the app’s container/service name if they share a Docker network). Forward port: the app’s port, e.g. 2283. Turn on Block Common Exploits and Websockets Support — many apps need the latter to update live. - Add the certificate. On the same form’s SSL tab, choose “Request a new SSL Certificate”, agree to the Let’s Encrypt terms, and enable Force SSL so plain HTTP requests are redirected to HTTPS. Save, wait a few seconds, and visit the name in a browser: a valid padlock, no warnings, and the app itself never knew anything changed.
- Repeat per service, and protect the sensitive ones. Each additional app is one more proxy host. For anything you would rather not leave at a bare login page — dashboards, admin tools — attach an access list: a username/password gate, an IP allowlist, or both, applied in the proxy host’s settings.
A concrete configuration example
The official single-container setup, using its built-in database:
services:
  app:
    image: jc21/nginx-proxy-manager:latest
    container_name: nginx-proxy-manager
    restart: unless-stopped
    ports:
      - "80:80"
      - "81:81"
      - "443:443"
    volumes:
      - ./data:/data
      - ./letsencrypt:/etc/letsencrypt
Two folders hold everything that matters: data (your proxy hosts, users and access lists) and letsencrypt (the certificates). Back both up and NPM can be rebuilt from this file alone. Port 81 is the admin interface, and publishing it as "81:81" makes that interface reachable on every network interface the NAS has: anyone who can reach the NAS on your LAN can open the admin login page, because a published port is protected by nothing by itself. Restrict it with firewall rules, or bind it to a single address, if your setup allows — and never forward port 81 from your router or expose it through a proxy host. If you need to administer NPM away from home, do it over a VPN or another properly secured private-access method; the safety rules below assume exactly that.
Safety: what not to expose
A reverse proxy makes publishing easy, which makes judgement the security feature. Follow three rules. Never expose the NPM admin interface itself (port 81) through a proxy host or a port forward — administer it from home, or over a VPN. Do not publish admin panels and infrastructure: your NAS’s own management login, router admin, Docker managers and the like should never sit on a public hostname, however strong the password; a VPN such as Tailscale is the right tool for reaching those. Publish only services meant to be used by people, keep them updated, and prefer apps with proper login and two-factor support. A useful middle path: create proxy hosts with certificates for internal names too, resolving only on your home network — you get tidy HTTPS names at home while the internet sees nothing at all. Our comparison of Tailscale, Cloudflare Tunnel and reverse proxies goes deeper on choosing between these approaches.
Common mistakes and troubleshooting
Certificate request fails
Almost always reachability: DNS not yet propagated, port 80 not actually forwarded to the NAS, or another device answering on port 80. Confirm the name resolves to your public IP from outside your network (a phone on mobile data works), confirm the forward, then retry — Let’s Encrypt rate-limits repeated failures, so fix the cause before hammering the button.
Proxy host shows as “Offline”
NPM cannot reach the app. Check the forward IP and port by opening the app directly at that address from your network, check the app container is running, and if you forwarded to a container name, confirm both containers share a Docker network — names only resolve within one.
The app loads but looks broken or will not log in
Enable Websockets Support on the proxy host first — many modern apps silently depend on it. If an app complains about wrong URLs or redirects, it may need to be told its public address in its own settings; that is an app setting, not a proxy fault.
Everything works at home but not from outside
Your router may be doing NAT loopback poorly, or your ISP may place you behind carrier-grade NAT, in which case no port forward will ever work and a tunnel or VPN approach is required instead. Test from a phone with Wi-Fi off to separate the two cases.
Official documentation and references
- Nginx Proxy Manager — the official guide
- Nginx Proxy Manager — the official setup instructions
- Nginx Proxy Manager on GitHub — the official repository
- Let's Encrypt — getting started with free TLS certificates
Frequently asked questions
Is Nginx Proxy Manager the same as Nginx?
NPM is a management layer over Nginx: the battle-tested Nginx web server does the actual proxying, while NPM generates its configuration from your form entries and adds the dashboard, user accounts, access lists and certificate automation. You get Nginx’s reliability without writing its configuration language.
Do I need a separate certificate for every service?
Each subdomain gets its own certificate (or one wildcard certificate covering all of them), and NPM handles issuing and renewing every one automatically. From your side, certificates are a checkbox at setup and then invisible — which is precisely the point.
Can I use NPM just inside my home, with nothing on the internet?
Yes, and it is an underrated setup. Point your local DNS at NPM, skip the router port forwards entirely, and use DNS-challenge certificates (or accept internal certificates) for HTTPS. You get memorable names and padlocks on your own network while exposing nothing at all.