

Home Assistant Automations Explained: Triggers, Conditions and Actions
Every Home Assistant automation is one sentence: when something happens, if the situation is right, then do something. Those three parts — trigger, condition and action — are the whole model. Once that sentence clicks, the automation editor stops being a form to guess at and becomes a tool you can reason with, and debugging stops being superstition and becomes checking which part of the sentence failed.
Published Nov 17, 2026 · Last updated Nov 18, 2026
This guide explains each part with examples you can copy, covers the four automation modes that quietly cause most “it fired twice” mysteries, and ends with a debugging method that finds the broken part in minutes instead of evenings.
What you need
- A running Home Assistant instance with at least a few devices — a light, a sensor and a phone with the companion app are enough for every example here.
- The automation editor under Settings, then Automations & scenes — no YAML knowledge is required to start, though this guide shows the YAML behind each example so the two views connect.
- One real problem to solve — a porch light, a bathroom fan, a “left open” warning. Learning against a real need beats following a tutorial to nowhere.
The three parts, precisely
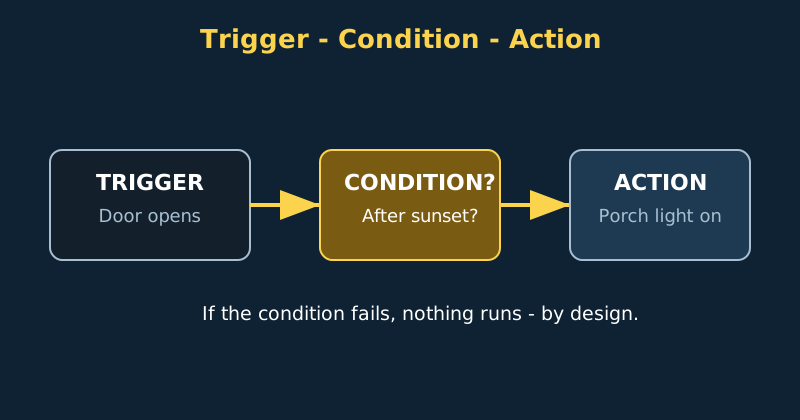
A trigger is an event, a moment in time: a door opened, the sun set, motion started, a phone entered a zone. Triggers are not states. “The door is open” does not trigger anything; “the door changed from closed to open” does. A condition is a test applied at the moment the trigger fires: is it after sunset, is anyone home, is the door still open? Conditions never start anything — they only allow or block. An action is what runs when the trigger fires and every condition passes: turn on a light, send a notification, wait ten minutes and check again. Holding those definitions firmly prevents almost every beginner mistake.
Step-by-step: build a porch light automation
- Create the automation and name it like a sentence. Go to Settings, then Automations & scenes, then Create automation. Name it “Porch light on when the front door opens after dark”. A name that states the trigger and the condition saves you opening the automation to remember what it does, and it makes the traces list readable months later.
- Add a state trigger. Choose a state trigger on your front door contact sensor, from closed to open — in entity terms, from
offtoonfor most contact sensors. Leaving the from and to fields blank would fire on every change, including battery updates on some devices, so be specific whenever you can. - Add the condition that makes it polite. Add a sun condition, after sunset and before sunrise. Now the sentence reads correctly: opening the door at noon does nothing, because the trigger fired but the condition blocked it. This separation is why you should resist cramming time logic into triggers — conditions are where “only when” belongs.
- Add the first action. Call the light turn-on service on the porch light, with a brightness that suits an entryway rather than a stadium. Test it now with the Run action button in the editor — note that running manually skips the trigger and, depending on how you invoke it, may skip conditions too, so a successful manual run proves the action works, not that the whole sentence does.
- Add a timed off, the careful way. Add a wait for a trigger — the door closing — with a timeout of ten minutes, then turn the light off. Prefer waiting on an event like this over a blind fixed delay: if someone is loading shopping through the door, a blind timer turns the light off on them, while an event-based wait responds to what the house is actually doing.
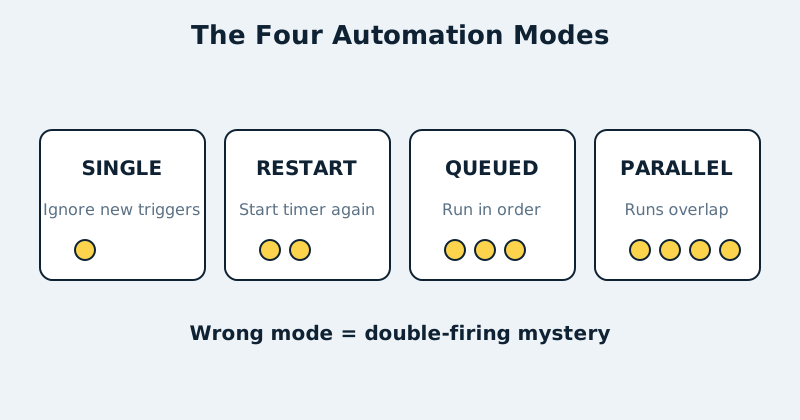
- Choose the mode deliberately. Open the automation settings and set the mode. Single mode ignores new triggers while the automation is already running — right for this porch light. Restart mode cancels the current run and starts again — right for motion lighting, where each new motion should extend the timer. Queued and parallel modes have real uses, explained below, but they should be a choice, not a surprise.
- Save, then test the whole sentence. Wait for the condition to be true, or temporarily adjust it, then open the door for real. If it works, open the automation's Traces view and look at the run: it shows the trigger, each condition result and each action step. Learning to read traces now will save you hours later.
The same automation in YAML
automation:
  - alias: "Porch light when front door opens after dark"
    description: "Entry light for arrivals after sunset"
    trigger:
      - platform: state
        entity_id: binary_sensor.front_door_contact
        from: "off"
        to: "on"
    condition:
      - condition: sun
        after: sunset
        before: sunrise
    action:
      - service: light.turn_on
        target:
          entity_id: light.porch
        data:
          brightness_pct: 80
      - wait_for_trigger:
          - platform: state
            entity_id: binary_sensor.front_door_contact
            to: "off"
        timeout: "00:10:00"
        continue_on_timeout: true
      - service: light.turn_off
        target:
          entity_id: light.porch
    mode: single
Read the wait in the middle carefully, because it decides when the light goes off. The light turns off when the door closes — or after 10 minutes if the door is still open. The timeout with continue_on_timeout: true is a deliberate safety fallback: if the door is left ajar, or the close event is ever missed, the automation carries on to the turn-off step anyway instead of leaving the porch light on all night.
The four modes, in plain language
Single ignores new triggers until the current run finishes; use it for doorbells, alerts and anything where a duplicate is worse than a miss. Restart stops the current run and starts fresh; use it for motion lights and timers that should extend. Queued lines up runs and executes them in order, up to a limit you set; use it rarely, for sequences that must each complete. Parallel lets runs overlap freely; use it when each trigger is independent, such as logging or notifying per event. If an automation behaves strangely under repeated triggers, the mode is the first thing to check.
Common mistakes and troubleshooting
- “It never fires.” Open Traces first. No trace at all means the trigger never matched — check the entity ID and the exact from and to states in Developer Tools, then States. A trace that stops early means a condition blocked it, and the trace shows which one.
- Using a state as a trigger. “When the temperature is above 25” needs a numeric state trigger, which fires when the value crosses the threshold — not a plain state trigger, which fires on every reported change and floods your log. In YAML it looks like this:
platform: numeric_statewithabove: 25(orbelow:), and you can add an optionalfor:duration so the value has to stay past the threshold for a while before the automation fires — handy for temperatures and power readings that wobble around the line. - Conditions tested at the wrong moment. A condition is checked when the trigger fires, not continuously. “Notify me if the door is open at 9 pm” is a time trigger with a door condition — the reverse of how most people first build it.
- Long delays that vanish on restart. A delay inside an automation is cancelled if Home Assistant restarts. For anything longer than a few minutes that must survive a restart, use a timer helper or a time-based trigger instead.
- One giant automation for everything. Ten small automations with sentence names are easier to test, disable and debug than one branching monster. Split by job, not by device.
Official documentation and references
- Home Assistant documentation — automations overview
- Home Assistant documentation — automation triggers
- Home Assistant documentation — automation conditions
- Home Assistant documentation — automation actions
- Home Assistant documentation — automation run modes
FAQ
Should I write automations in the visual editor or in YAML?
Both produce the same automations. The visual editor is safer while learning and shows you valid options; the YAML view behind it, available from the menu in the editor, teaches you the structure. Pick per automation, and never hand-edit the automations file while also expecting the editor to track your changes unless you understand how storage mode works.
What is the difference between a script and an automation?
An automation is a trigger plus actions; a script is just the actions, saved to run on demand or be called by several automations. When two automations share the same sequence — the same “goodnight” routine, for example — move that sequence into a script and call it from both.
Why did my automation fire when Home Assistant restarted?
Some triggers, especially state triggers without specific from and to values, can match as entities settle after a restart, and time-pattern triggers can align unexpectedly. Tighten from and to states, and for sensitive automations add a condition that Home Assistant has been running for a few minutes using an uptime sensor.