

ESPHome for Beginners: Your First Three DIY Devices
ESPHome turns a ten-dollar microcontroller board into a sensor, a relay controller or a Bluetooth relay that Home Assistant discovers automatically — no cloud account, no subscription and no soldering iron required for your first build. This guide walks you through three starter devices in order of difficulty, so each one teaches a skill the next one uses.
Published Nov 17, 2026 · Last updated Nov 18, 2026
What you need
You need a computer on the same network as Home Assistant, a USB data cable (many cheap cables are charge-only, so test yours), and one ESP32 development board for the first device. ESP32 boards are preferable to the older ESP8266 for beginners because they include Bluetooth, which your third device will use, and they have more memory headroom for future features. For device one, add a DHT22 or BME280 temperature and humidity sensor on a breakout board; breakout boards include the supporting components and use plain header pins, so you can connect everything with jumper wires. For device two you will use a commercially made ESPHome-compatible smart plug with a relay inside a proper enclosure — never a bare relay board connected to mains wiring. For device three you need nothing extra: the same model of ESP32 board becomes a Bluetooth proxy on its own. You also need the free ESPHome add-on or ESPHome Device Builder installed in Home Assistant, which provides a dashboard for creating, editing and wirelessly updating every device from your browser.
How ESPHome actually works
Instead of writing Arduino code, you describe a device in a short YAML file: its name, its Wi-Fi details, and a list of components such as sensors, switches and binary sensors. ESPHome compiles that description into firmware, flashes it over USB the first time, and then updates it over your Wi-Fi network from then on. Home Assistant talks to the finished device through ESPHome's native API, which is fast, encrypted and entirely local. If Home Assistant goes down, the device keeps running any logic you put on the board itself — a key difference from cloud gadgets that become bricks when a server disappears.
Device one: a room temperature and humidity sensor
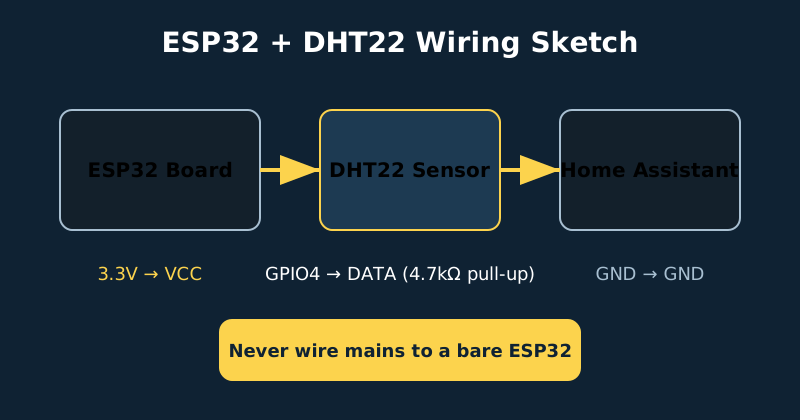
- Wire the sensor. Connect the sensor's VCC pin to the ESP32's 3.3V pin, GND to GND, and DATA to GPIO4. Power everything from USB only while you learn; do not connect anything else. One warning before you copy any pin number from any guide, including this one: GPIO availability and restrictions vary by ESP32 board variant — some pins are input-only, some are tied to boot behaviour — so check your exact board's pinout first. GPIO4 is a safe general-purpose pin on the common esp32dev board used here.
- Create the device. In the ESPHome dashboard choose New Device, give it a clear name such as bedroom-climate, and pick ESP32. ESPHome generates a starter YAML file with Wi-Fi and API sections already filled in.
- Add the sensor block. Paste the sensor configuration from the example below into your YAML, matching the pin you wired. Save the file.
- Install over USB. Plug the board into the computer running ESPHome, choose Install, then the wired USB option. The first compile can take several minutes; later updates are much faster and can be sent wirelessly.
- Adopt it in Home Assistant. Home Assistant should discover the new device automatically. Open it and confirm temperature and humidity update when you breathe gently near the sensor.
- Place it properly. Put the finished node at chest height, away from radiators, direct sun and exterior doors. A sensor in a draught teaches your automations the wrong lesson about the room.
esphome:
  name: bedroom-climate

esp32:
  board: esp32dev
  framework:
    type: esp-idf

wifi:
  ssid: !secret wifi_ssid
  password: !secret wifi_password
  # Fallback hotspot: if the device cannot join your Wi-Fi it
  # starts its own access point so you can still reach it.
  ap:
    ssid: "Bedroom Climate Fallback"
    password: "use-your-own-password"

captive_portal:

api:
ota:
  - platform: esphome
logger:

sensor:
  - platform: dht
    pin: GPIO4
    model: DHT22
    temperature:
      name: "Bedroom Temperature"
    humidity:
      name: "Bedroom Humidity"
    update_interval: 60s
That sixty-second update interval is deliberate. Climate changes slowly, and a sensor that reports every second floods your recorder database with numbers nobody will ever graph. If you later swap the DHT22 for a BME280, you gain air pressure as well, and the wiring changes to I2C — two data wires, SDA and SCL, instead of one — but the workflow of edit, validate, install and check stays exactly the same.
Device two: a relay you can trust
Safety first, before you wire or flash anything: respect the plug's printed rating. Space heaters, kettles and other resistive heating loads draw far more current than beginners expect — never run them through a smart plug unless the plug is explicitly rated for the load, and never hide a plug behind furniture powering a heater unattended. Use a commercially made plug in a proper enclosure; never a bare relay board on mains wiring.
Your second device teaches output instead of input. Buy a smart plug that is documented as ESPHome-flashable or sold pre-flashed, follow its maker's instructions to put your own configuration on it, and then add a simple switch component for its relay and, on many models, power monitoring. Test it first with a table lamp, not a heater. Set a friendly name, add it to an automation such as turning a dehumidifier on when your new climate sensor reports humidity above sixty percent for twenty minutes, and you have closed the loop: a device you built sensing, and a device you control acting.
Device three: a Bluetooth proxy
Your third device needs no wiring at all. Flash a spare ESP32 with ESPHome, add the Bluetooth proxy component, and place it in a room where Bluetooth thermometers, plant sensors or presence beacons are out of range of your Home Assistant host. The proxy listens for Bluetooth Low Energy advertisements and forwards them over Wi-Fi, extending coverage room by room for the price of a USB charger you probably already own. Keep proxies a few metres from the devices they serve and away from metal enclosures and USB 3 hubs, both of which can interfere with the radio.
Common mistakes and troubleshooting
The most common first-flash failure is a charge-only USB cable: the board lights up but never appears as a serial device. Swap the cable before you change any code. The second is a compile error caused by indentation — YAML is strict about spaces, so use the dashboard's Validate button and read the first error line, not the last. If a device shows as offline, check that it joined the Wi-Fi network name you expected, that your router is not isolating IoT devices from Home Assistant, and that you have not created two devices with the same name. If sensor readings are wildly wrong, suspect wiring and power before software: loose jumper wires and underpowered USB ports cause more phantom faults than ESPHome itself. Finally, keep the fallback hotspot and OTA sections in your configuration; they are your recovery path when you change your Wi-Fi password later.
Official documentation and references
- ESPHome documentation — getting started and device configuration
- ESPHome — full component index for sensors, switches and outputs
- ESPHome guide — installing the Home Assistant add-on
- ESPHome — Bluetooth Proxy component documentation
FAQ
Do I need to know how to code?
No. You need to copy YAML carefully, keep indentation consistent and change names and pin numbers to match your hardware. The ESPHome dashboard validates your configuration before compiling, and the component documentation gives a working example for almost every supported sensor.
ESP32 or ESP8266 for a first board?
Choose ESP32. It costs about the same in November 2026, includes Bluetooth for proxy use, handles encryption comfortably and is where most new ESPHome development happens. ESP8266 boards you already own still work well for simple sensor nodes.
Is ESPHome safe to run on my home network?
It is designed for local control: devices use an encrypted API connection to Home Assistant and do not need internet access or a vendor account. Use a strong, unique Wi-Fi password, keep the API encryption key that ESPHome generates, and update devices occasionally from the dashboard.
Related guides
- Presence Detection in Home Assistant
- Fix a Flaky Zigbee Network
- Radios and Protocols Explained
- Home Assistant Automations Explained
Gear for this build
Prices are editorial and change often; buttons show live prices. Some links may earn a commission at no cost to you — see the disclosure page.