

Under-Cabinet Kitchen Lighting That Works with Home Assistant
Under-cabinet lighting is the single upgrade that makes a kitchen feel finished — and it is also one of the easiest smart-lighting projects to get right, because the whole system runs on low-voltage DC. A good LED strip, a local smart controller, and a sensibly placed power supply give you warm task light for cooking, a soft glow at night, and full control from Home Assistant without any cloud account. This guide walks through the choices, the wiring, and the automations that make it feel effortless.
Published Nov 17, 2026
What you need
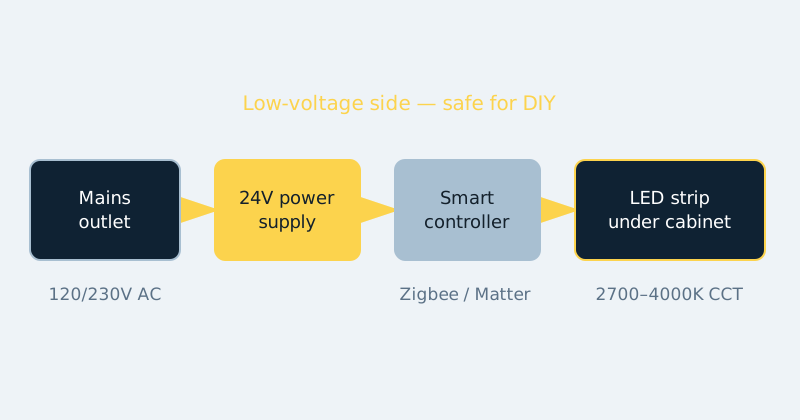
- LED strip: a 24V tunable-white (CCT) strip, ideally a COB (chip-on-board) type for a smooth, dot-free line of light. 24V beats 12V for runs over a few metres because voltage drop is lower and brightness stays even.
- Controller: a Zigbee, Z-Wave, or Matter-over-Wi-Fi LED controller that Home Assistant can drive locally — for example a Zigbee CCT controller paired to your existing coordinator. Avoid controllers that only work through a vendor cloud app.
- Power supply: a 24V DC power supply (often called a driver or brick) rated at least 20 percent above the strip's total draw. A typical kitchen zone uses 30–60W.
- Mounting: aluminium channel with a diffuser if the strip is visible from seated height; the channel also acts as a heat sink and extends strip life.
- Wire and connectors: 18–20 AWG two- or three-conductor low-voltage cable, solderless strip connectors for corners, and cable clips.
- Optional: a smart wall switch or a wireless scene switch so the lights still work when someone does not want to use an app or voice.
Safety note: everything after the power supply is low-voltage DC and is a reasonable DIY job. Anything that involves mains (120V/230V) wiring — adding an outlet, hardwiring a driver, or working inside a junction box — is work for a licensed electrician in most jurisdictions. When in doubt, use a plug-in power supply into an existing outlet and keep every mains connection factory-made.
Choosing the strip: what actually matters
Three specifications decide whether the result looks premium or disappointing. First, colour: a tunable-white CCT strip lets you shift from warm 2700K for evenings to neutral 4000K for food prep, and Home Assistant can automate that shift through the day. Fixed warm white is cheaper and perfectly fine if you know you will never want cooler task light. Second, density and diffusion: COB strips pack LEDs so closely that the light reads as one continuous bar even without a diffuser, which matters on glossy countertops that reflect every individual diode. Third, colour rendering: look for CRI 90 or higher so food, wood, and skin tones look natural instead of washed out.
Measure each cabinet run separately and treat each continuous run as a zone. Kitchens often have cabinets on two sides of the room, split by a sink, range, or window — plan for two zones with either two controllers or one controller per zone, rather than trying to bridge a long low-voltage cable across the room. Long thin cable runs waste power as heat and cause the far end of a strip to dim and shift colour.
Power options, from simplest to cleanest
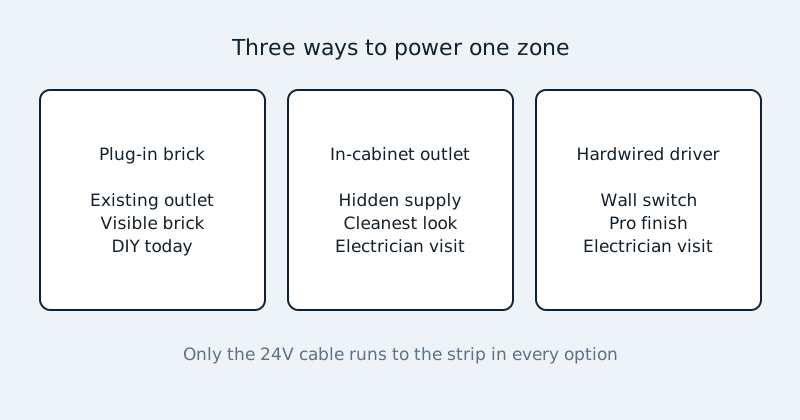
Plug-in brick at an existing outlet is the fastest route: the supply plugs into a countertop or under-sink outlet, and only the thin 24V cable travels to the controller and strip. It costs almost nothing to install but leaves a visible brick and cable to hide. An in-cabinet outlet — for example inside a microwave cabinet or above the cabinets — hides everything, but adding that outlet is mains work for an electrician. A hardwired driver in a cabinet or basement with a wall switch is the cleanest professional finish and also electrician territory. A useful middle path: run only the 24V side through walls and cabinets yourself, because low-voltage cable is far less restricted, and let the power supply live wherever an outlet already exists.
Step-by-step installation
- Sketch the kitchen and mark each cabinet run, the nearest outlet, and where the controller will live (inside a cabinet near the strip start is typical). Measure each run in metres.
- Calculate power: multiply strip watts per metre by total metres, then choose a power supply at least 20 percent larger. A 14W/m strip over 4 metres needs about 56W, so a 75W or 100W 24V supply is right.
- Bench-test everything on the counter first: supply to controller, controller to strip. Pair the controller to Home Assistant and confirm brightness and colour temperature respond before anything is stuck down.
- Clean the underside of the cabinets with isopropyl alcohol and let it dry — strip adhesive fails early on greasy surfaces, which kitchens always have.
- Mount aluminium channel if you are using it, then press the strip into the channel or directly under the cabinet, positioned toward the front lip so light washes the worktop rather than the backsplash.
- Connect zones with low-voltage cable, keeping polarity consistent. For CCT strips the controller outputs are usually labelled V+, CW, and WW — match them to the strip pads exactly.
- Power up and check for voltage drop: if the far end looks dimmer or warmer, feed power from both ends of the run or split the run into two shorter zones.
- In Home Assistant, rename the light entity clearly (for example Kitchen Cabinets Left), set a sensible default transition, and group zones into one light group if you want a single control.
- Add a physical control — a smart switch, a wireless button by the door, or a motion sensor — so the lights never depend on a phone.
Automations that make it feel smart
The lighting itself is the win; automations are the polish. Three patterns cover most kitchens. A motion or presence trigger brings cabinets to full neutral brightness while cooking and turns them off after a quiet period. A time-based scene drops them to 15 percent warm after 22:00, so a midnight glass of water does not need the main lights. And a circadian or adaptive-lighting integration can drift colour temperature through the day automatically. Keep automations forgiving: a manual switch press should always win, and a generous off-delay avoids the lights dropping while someone is standing still at the counter.
# Example: gentle night lighting from a motion sensor
automation:
  - alias: "Kitchen cabinets at night"
    trigger:
      - platform: state
        entity_id: binary_sensor.kitchen_motion
        to: "on"
    condition:
      - condition: time
        after: "22:00:00"
        before: "06:00:00"
    action:
      - service: light.turn_on
        target:
          entity_id: light.kitchen_cabinets
        data:
          brightness_pct: 15
          color_temp_kelvin: 2700
          transition: 2
Common mistakes and troubleshooting
The far end of the strip is dim or a different colour. That is voltage drop. Shorten the run, use thicker cable, feed the strip from both ends, or split it into zones. The strip fell down after a month. Adhesive alone rarely survives kitchen heat and steam — use aluminium channel with clips or screws. Flicker at low brightness. Usually a controller and strip mismatch or an under-rated power supply; test at full power on the bench and size the supply with headroom. The controller keeps dropping off the network. Zigbee controllers inside metal-heavy kitchens can struggle; a mains-powered Zigbee device nearby acting as a router, or moving the coordinator's antenna away from the NAS and USB 3 ports, usually fixes it. One zone is warm and the other cool at the same setting. Strips from different production batches vary — buy all zones from the same order where you can, and fine-tune each zone's default in Home Assistant.
Official documentation and references
- Home Assistant — light entities, brightness and colour control
- Home Assistant — automation triggers, conditions and actions
- Home Assistant — the ZHA integration for Zigbee dimmers and switches
FAQ
Is 24V really better than 12V for under-cabinet runs?
Yes for anything beyond a short single cabinet. At the same wattage, 24V draws half the current, so voltage drop along the strip and cable is much lower, brightness stays even, and you can run longer zones from one feed. The only cost is making sure the strip, controller, and power supply are all 24V — never mix voltages.
Can I cut the strip to fit my cabinets?
Yes. Almost all strips can be cut at marked intervals, usually every few centimetres, at the copper pads. Cut only on the marks, and use solderless connectors or soldered leads to join corners. Plan cuts before ordering so each cabinet run ends neatly at a corner rather than mid-door.
Do I still need a wall switch if Home Assistant controls the lights?
You should have one. Guests, family members, and future you during a server outage all expect a physical control. A smart switch that controls the zone, or a wireless scene switch stuck by the doorway, keeps the system friendly — and a controller that restores its last state after a power cut avoids surprises.